Table of Contents
- App Overview
- Installation and Running
- Interface Introduction
- Basic Operations
- Session Management
- Model Configuration
- Skill System
- Task Scheduling
- Feishu Integration
- Troubleshooting
- Wiki Knowledge Base
- High-Speed Code Analyzer
- Memory System
- Personalized Settings
- Open Source Licenses
1. App Overview
1.1 What is ZAgent
ZAgent is a desktop AI assistant application. Its purpose is to lower the barrier for users to use AI assistants and provide a powerful AI Agent application.

Main Features:
- User-friendly GUI: Embedded terminal, browser, skill management, and task management make using AI Agent easier
- Incremental Markdown Rendering: Incremental Markdown parser supporting streaming AI responses
- Session Management: Create, save, restore, and branch conversation sessions with flexible session management for more efficient AI Agent usage
- Model Selection: Supports multiple AI models and providers, with direct API key input support
- Tool Mode: Switch between Plan (read-only) and Build (full access) modes for more reliable AI coding
- Skill System: Load and manage custom skills for professional tasks with more intuitive skill management
- Browser Automation: Integrated browser automation for convenient internet access by Agent
- Terminal Integration: Built-in terminal support for Agent to help non-professionals manage computers/servers
- Feishu Integration: Supports Feishu message synchronization
- Wiki Knowledge Base: Built-in personal knowledge base with bidirectional linking and AI augmentation
- Memory System: Long-term memory that persists across sessions for personalized conversations
- Code Analyzer: Rust-implemented high-speed code analysis engine for millisecond-level parsing
- Open Source Licenses: Built-in credits dialog showing all 60+ open-source packages used
1.2 System Requirements
| Item | Minimum | Recommended |
|---|---|---|
| Operating System | Windows 10+ / Windows 11 / Mac OS / Linux coming soon | |
| Memory | 4 GB | 8 GB+ |
| Disk Space | 200 MB | 500 MB |
2. Installation and Running
2.1 Download and Install
After downloading the installer, click to install. The program will be installed to the specified directory.
2.2 First Run Configuration
After first launch, you need to configure the following:
- Model Configuration: The model's API Key can be set directly in the model dialog or via a system environment variable. You can either paste the API key directly or add the system variable name representing the API key in settings.
- Proxy Settings (optional): Browser proxy
For detailed model configuration, see Section 6.
3. Interface Introduction
3.1 Overall Layout
ZAgent uses a classic three-section layout: menu bar, workspace, and status bar. The workspace is divided into 2 parts. The right side is the chat window, and the left side is the function area, including embedded terminal, browser, editor, skills, and tasks.
3.2 Menu Bar
The menu bar is at the top and contains the following menu items:
| Menu | Functions |
|---|---|
| File | Exit |
| Session | New, Load, Restore, Tree, Compress, Export, Info |
| Skill | Skill List, New Skill |
| Task | Task List, New Task |
| Settings | Select Model, New Model, Proxy, Feishu |
| Mode | Plan/Build, Theme, Language, Auto/Manual Compress, Feishu |
| Help | Shortcuts, Open Source License, About |
File Menu
Exit: Exit the application
Session Menu
New: Create a new sessionLoad...: Load a saved sessionRestore Recent: Restore the most recent sessionBranch: Create a new session branch from current positionTree Structure: View session treeCompress: Manually compress contextExport HTML: Export session to HTMLSession Info: View current session information
Settings Menu
Select Model...: Select AI modelNew Model...: Add a new modelSet Proxy...: Configure proxyFeishu Settings...: Configure Feishu integrationMemory Management...: View and manage long-term memories
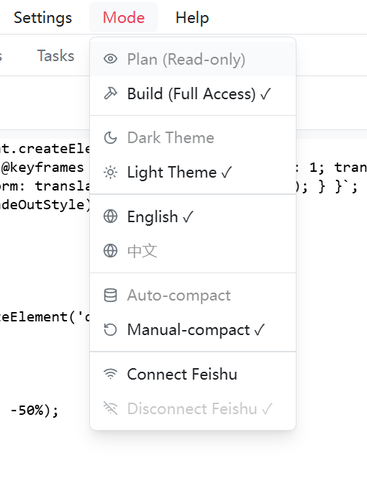
Mode Menu
Plan (Read-only): Plan mode, AI cannot execute operationsBuild (Full Access): Build mode, AI can execute various operationsDark Theme: Switch to dark themeLight Theme: Switch to light themeEnglish: Switch to English interface中文: Switch to Chinese interfaceAuto Compress: Enable auto context compressionManual Compress: Disable auto compressionFeishu Connect: Connect to FeishuFeishu Disconnect: Disconnect from Feishu
Help Menu
Shortcuts: Show shortcuts helpOpen Source License: Show open source licenseAbout: Show about information
3.3 Right Workspace - Chat Window
The chat tab is the default main interaction area, displaying conversation history: including user messages, assistant messages, tool calls, and tool call result messages.
Interface Elements:
Message Bubbles:
- User messages (left-aligned)
- Assistant messages (supports Markdown rendering)
- Tool calls (shows executed commands)
- Tool results (shows execution results)
Input Box:
- Supports multi-line input (Shift+Enter for new line)
- Enter to send message
- Fixed at bottom
Message Operations:
- Copy button: Copy message content
- Save As button: Export to PDF/HTML
3.4 Left Workspace - Function Tabs
The left workspace has multiple switchable tabs:
| Tab | Icon | Function |
|---|---|---|
| Skills | 🛠→/td> | Skill management and execution |
| Tasks | 📋 | Scheduled task management |
| Browser | 🌐 | Browser automation |
| Editor | 📝 | Code editor |
| Terminal | 💻 | Terminal emulator |
Skills Tab
Displays the list of loaded skills, including:
- Project skills (located in
.zeta/skills/) - User skills (located in
~/.zeta/agent/skills/)
Each skill displays:
- Icon and name
- Description
- Auto/Manual tag
- Execute button

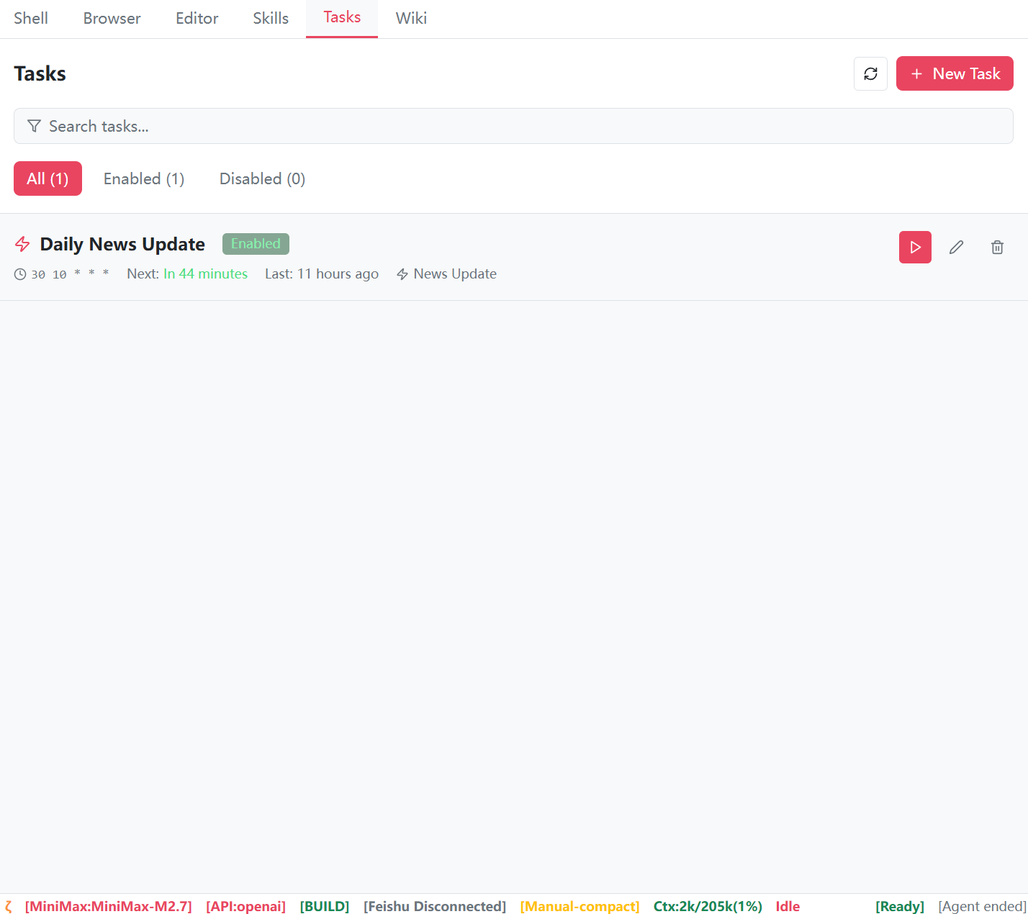
Tasks Tab
Displays configured scheduled tasks:
- Task name
- Execution time (next/last)
- Status (enabled/disabled)
- Action buttons (execute now/edit/delete)
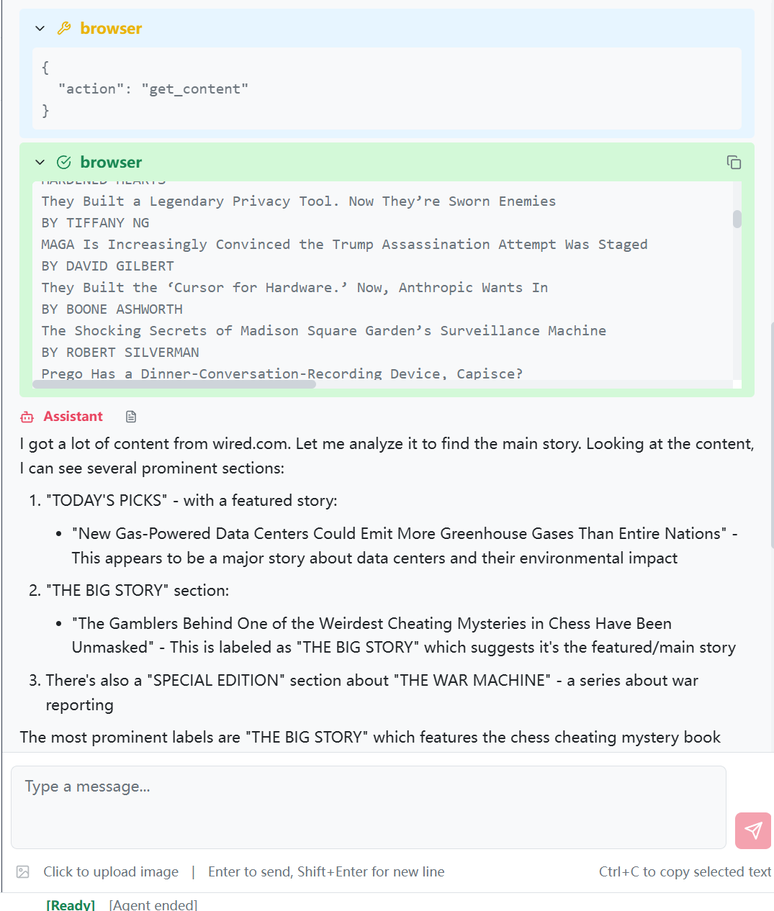
Browser Tab
Integrated browser supporting web automation:
- Navigation buttons (forward/back)
- URL input box
- Snapshot button
- Interactive elements panel

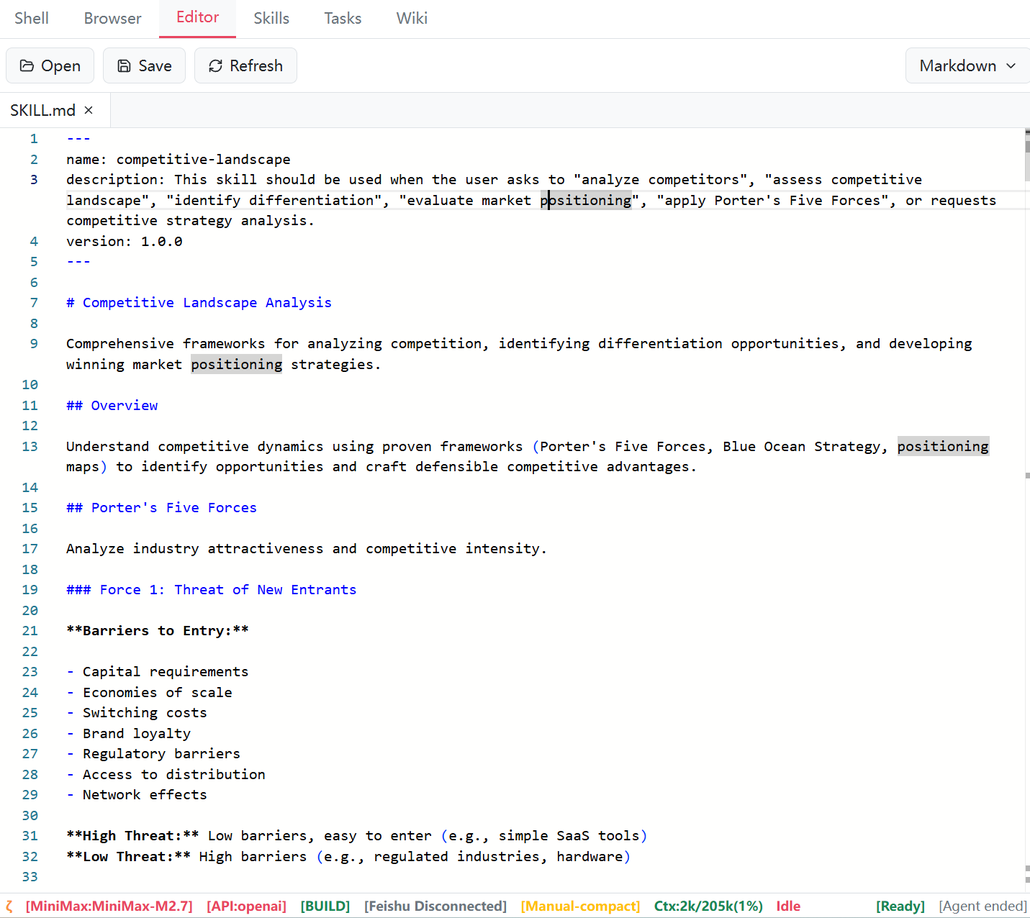
Editor Tab
Integrated code editor:
- Syntax highlighting
- Code completion
- Multiple file tabs
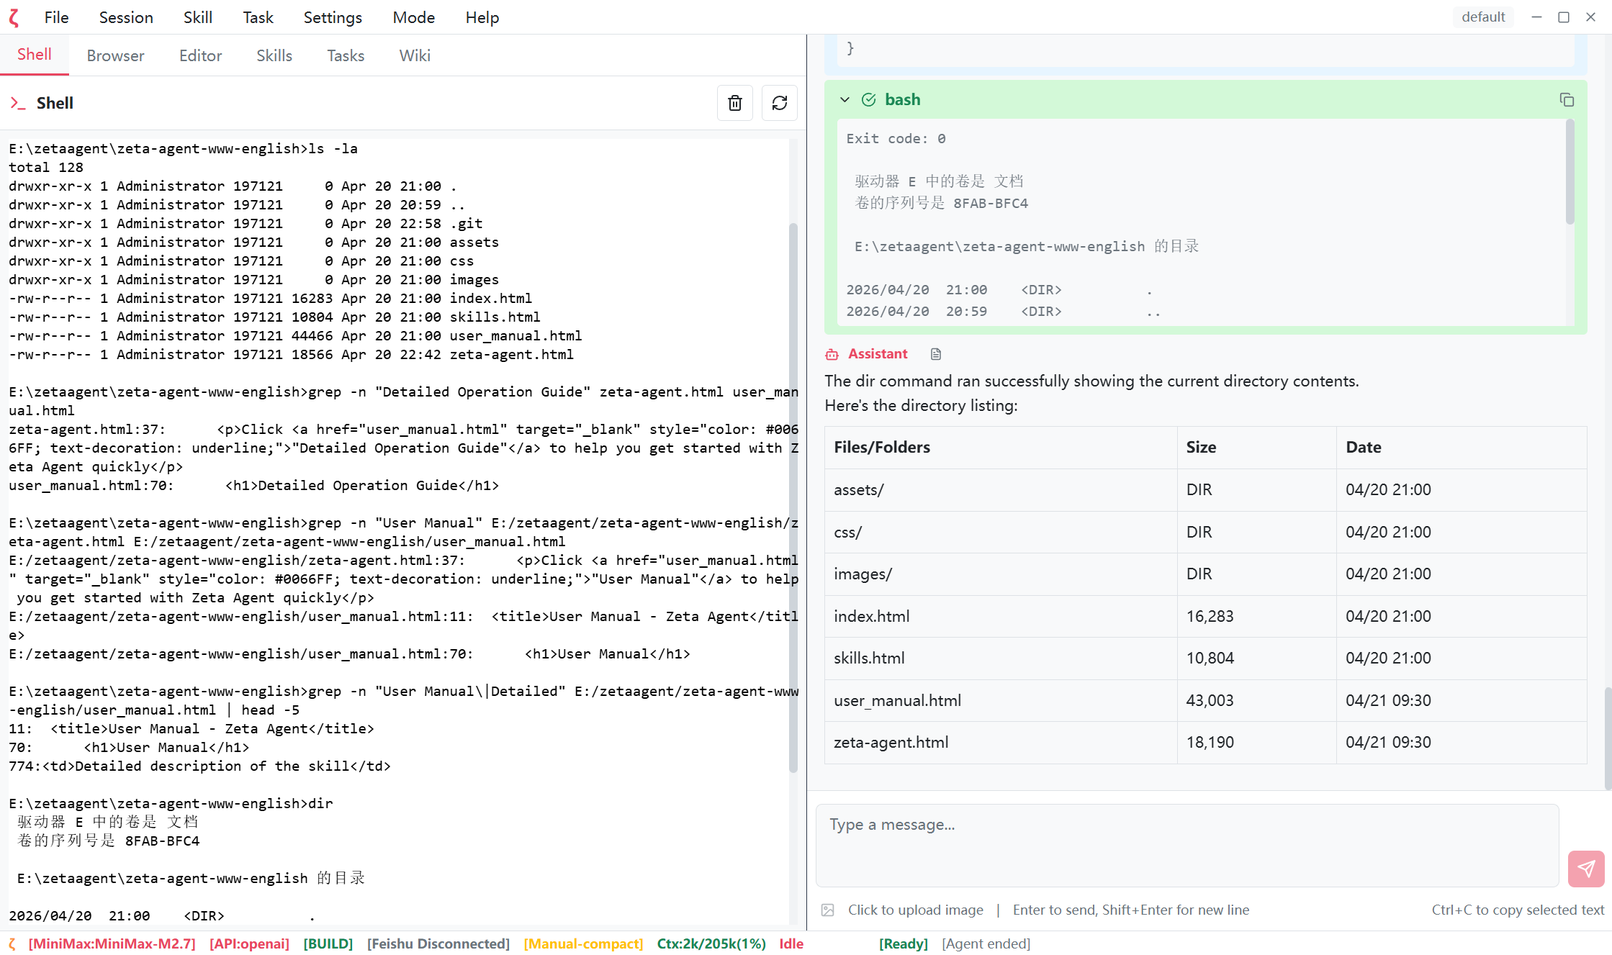
Terminal Tab
Integrated terminal with Windows Console support:
- Command input and output
- Supports shell commands
3.5 Status Bar
The status bar is at the bottom and displays current status:
[Ready] [Plan] [Model: deepseek-chat] [Context: 45%] [Idle]
Status Descriptions:
| Status | Meaning |
|---|---|
| Ready/Active/Error/Stopped | Current Agent status |
| Plan/Build | Current tool mode |
| Model name | Currently used AI model |
| Context | Context usage percentage |
| Idle/Outputting/Processing | Current operation status |
4. Basic Operations
4.1 Send Messages
- Enter your message in the bottom input box
- Press Enter to send
- Shift+Enter for new line
4.2 Switch Theme
Click menu Mode →Dark Theme or Light Theme
4.3 Switch Language
- Click menu
Mode→Language - Select
Englishor中文
4.4 Switch Tool Mode
| Mode | Description | Permissions |
|---|---|---|
| Plan | Read-only mode | AI cannot execute any operations, only conversation |
| Build | Full access mode | AI can execute various operations |
Switch method: Click menu Mode →Select Plan (Read-only) or Build (Full Access)
5. Session Management
5.1 Concept Explanation
Session is the core concept in ZAgent, used for managing conversation context.
Session Tree displays the historical structure of sessions:
Root
├── User msg 1 (Node 1)
├── Assistant msg 2 (Node 2)
→  └── Branch A
→      ├── User msg 3 (Node 3)
→      └── Assistant msg 4 (Node 4)
└── Current (Node 5)
Node Types:
| Icon | Type | Description |
|---|---|---|
| 👤 | User | User message |
| 🤖 | Assistant | Assistant message |
| 🔧 | Tool | Tool call |
| 📦 | Compaction | Compression point (context compression) |
| 📄 | Branch Summary | Branch summary |
5.2 Create New Session
Click Session →New
Note: Creating a new session will clear the current chat window but does not affect saved sessions.
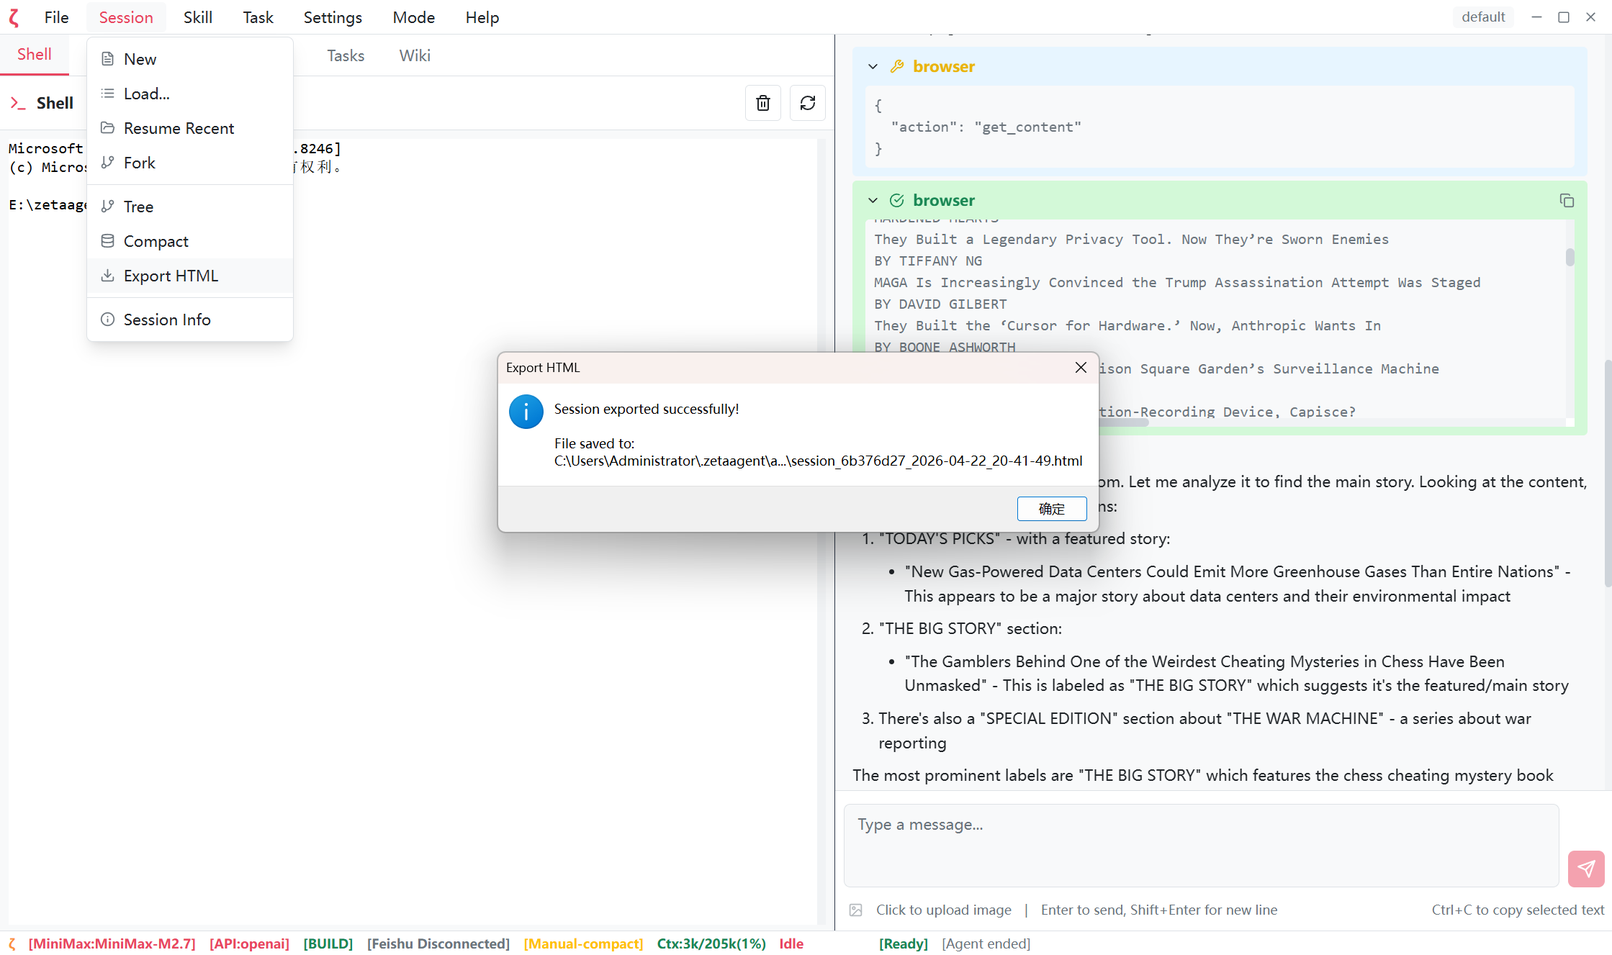
5.3 Export Session
- Click
Session→Export Session to HTML - Choose save location
- Confirm export
5.4 Load Session
- Click
Session→Load... - Search for sessions in the popup dialog
- Double-click to load after selecting session
5.5 Restore Recent
- Click
Session→Restore Recent - System automatically restores the last session
5.6 Session Tree Operations
Click Session →Tree to open the session tree dialog:
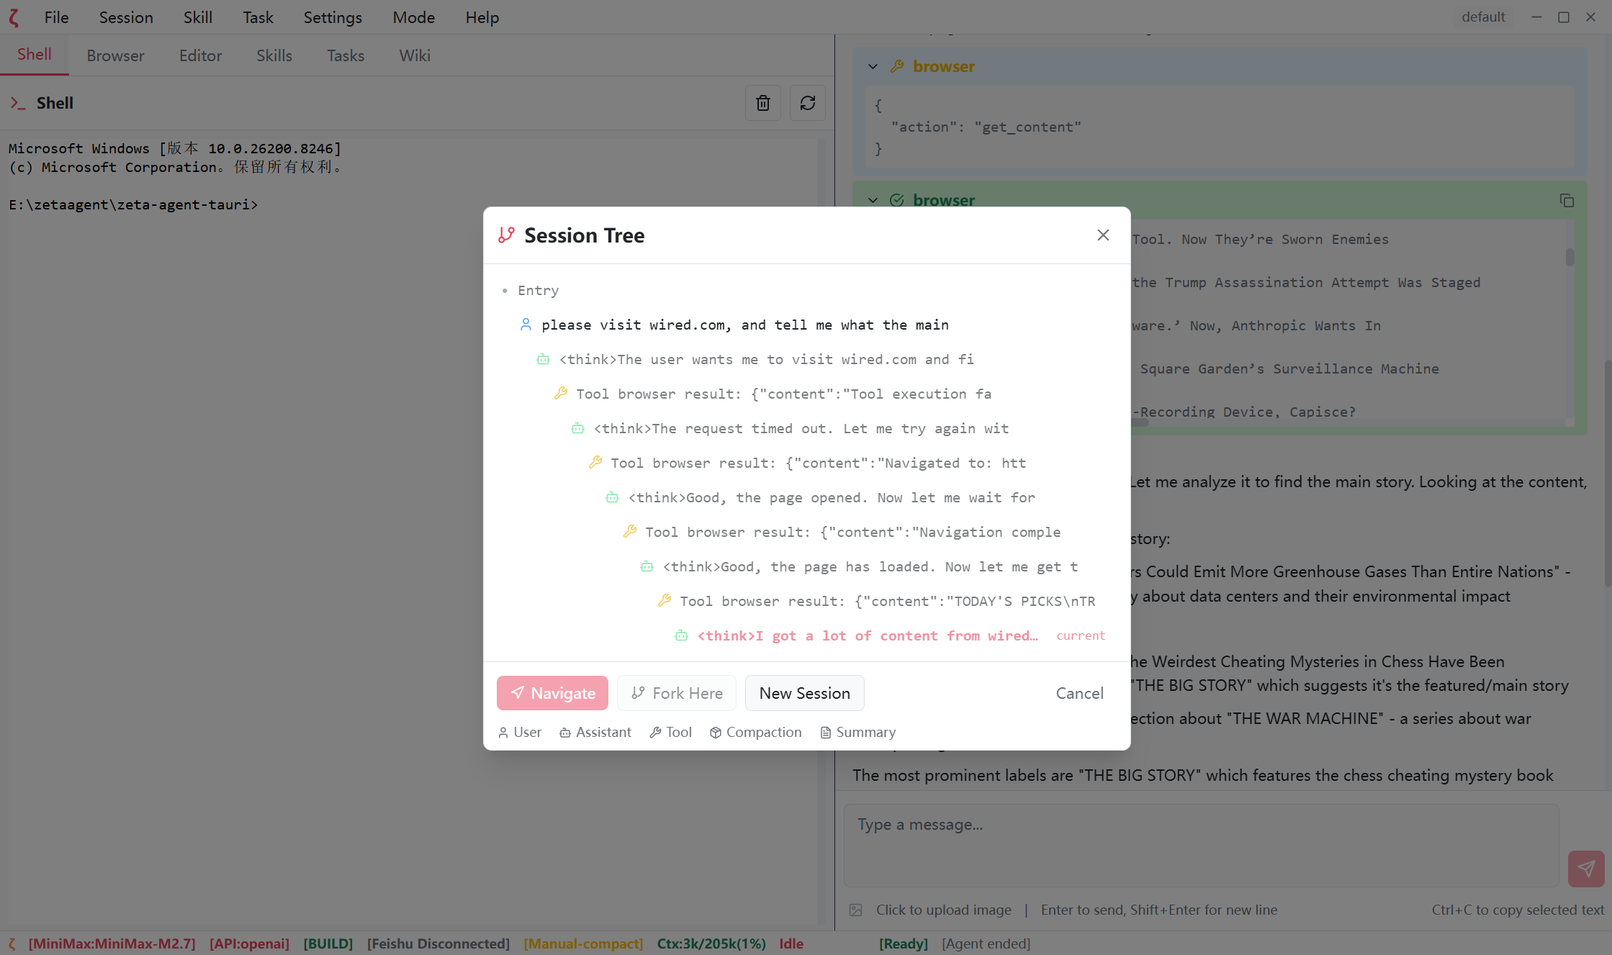
Function Descriptions:
| Function | Description |
|---|---|
| Navigate | Jump to historical node to continue conversation |
| Fork Here | Create new branch from selected node |
| New Session | Create a completely new blank session |
Navigate Two Modes:
- With Summary: Generate summary of skipped parts, preserving key information
- Without Summary: Direct jump, discarding subsequent nodes
Example:
Currently at node 5, choose to jump to node 2:
- Without Summary: Nodes 3, 4, 5 are discarded
- With Summary: Nodes 3, 4, 5 are compressed into a summary and preserved
5.7 Branch Session
Method 1: Menu Branch
Click Session →Branch: Create new branch from current position
Method 2: Session Tree Branch
In the session tree, select any historical node, click Fork Here
Differences:
| Operation | Branch Point |
|---|---|
| Menu Fork | Branch from current position |
| Tree Fork Here | Branch from selected historical node |
5.8 Compress Context
Auto Compress: Automatically triggered when context usage exceeds threshold (default 80%)
Manual Compress:
- Click
Session→Compress - Confirm compression operation
Compression will:
- Preserve system prompt
- Compress conversation history into summary
- Release context space
6. Model Configuration
6.1 Supported Model Interfaces
ZAgent supports models compatible with OpenAI Completion and Anthropic Messages interfaces. For example, mainstream domestic models supported by Alibaba's Bailian Cloud Coding Plan can be used. DeepSeek, MiniMax, Kimi, and GLM related models can all be used.
6.2 Configure New Model
- Click
Settings→New Model... - Fill in model information:
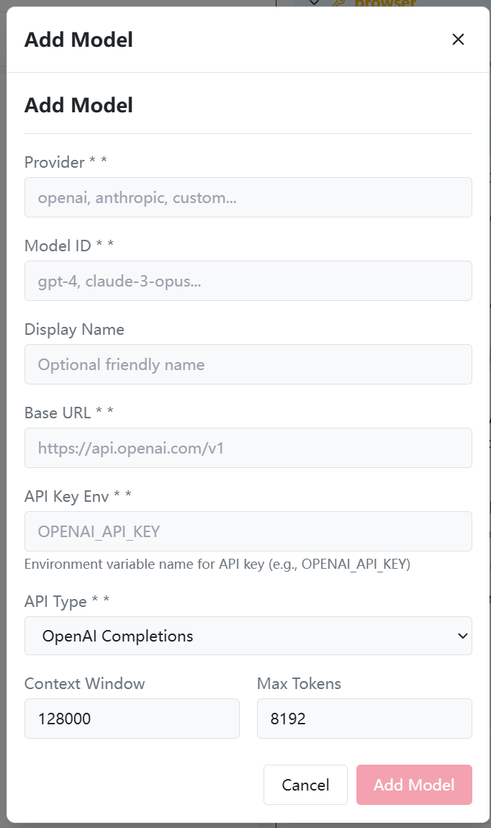
Required Fields:
| Field | Description | Example |
|---|---|---|
| Provider | Model provider | deepseek, openai |
| Model ID | Model identifier | deepseek-chat |
| Display Name | Friendly name | DeepSeek Chat |
| API Key or Env Variable | Environment variable name for API key, or paste the API key directly | DEEPSEEK_API_KEY |
| Base URL | API endpoint | https://api.deepseek.com |
| API Type | API protocol type | deepseek |
| Context Window | Context token count | 128000 |
| Max Tokens | Max tokens per response | 8192 |
Optional Fields:
- Cost settings (input/output price)
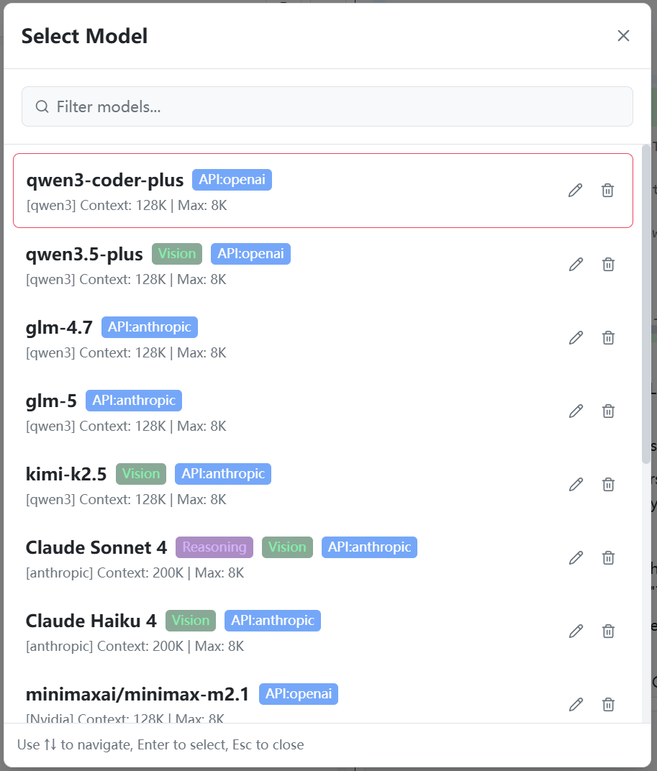
6.3 Select Model
- Click
Settings→Select Model... - Select from model list
- Double-click or press Enter to confirm
6.4 Model Information Display
After model selection, the status bar shows current model information:
[Model: deepseek-chat] [Context: 45%]
6.5 Environment Variable Configuration
API keys need to be set in system environment variables or application configuration:
| Model | Environment Variable | How to Get |
|---|---|---|
| DeepSeek | DEEPSEEK_API_KEY | DeepSeek Open Platform |
| OpenAI | OPENAI_API_KEY | OpenAI Platform |
| Anthropic | ANTHROPIC_API_KEY | Anthropic Console |
| Qwen | DASHSCOPE_API_KEY | Alibaba Cloud DashScope |
6.6 Proxy Settings
If you need a proxy to access external APIs:
- Click
Settings→Set Proxy... - Enable proxy
- Fill in proxy information:
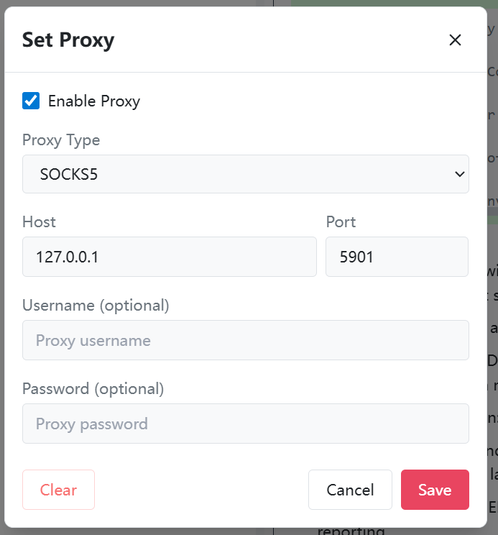
| Field | Description |
|---|---|
| Enable Proxy | Turn proxy on/off |
| Proxy Type | http, https, socks5 |
| Host | Proxy server address |
| Port | Proxy server port |
| Username | Authentication username (optional) |
| Password | Authentication password (optional) |
7. Skill System
7.1 Concept Explanation
Skill is the tool extension system of ZAgent. Each skill defines a set of available tools and capabilities.
Skill File Structure:
---
name: Skill Name
description: Skill description
read_when:
  - Condition 1
  - Condition 2
metadata: {}
allowed-tools: ToolName(tools:*)
auto_inject: true/false
---

# Skill Content
## Instructions...
7.2 Skill Storage Locations
Skills are stored in two locations:
| Location | Path | Description |
|---|---|---|
| Project Skills | .zeta/skills/ |
Project-level skills |
| User Skills | ~/.zeta/agent/skills/ |
User-level skills |
7.3 View Skills
- Switch to the
Skillstab in the right panel - View the skill list
Each skill displays:
- Icon
- Name
- Description
- Trigger condition (auto/manual)
7.4 Create New Skill
- Switch to the
Skillstab - Click
New Skill - Fill in skill information:
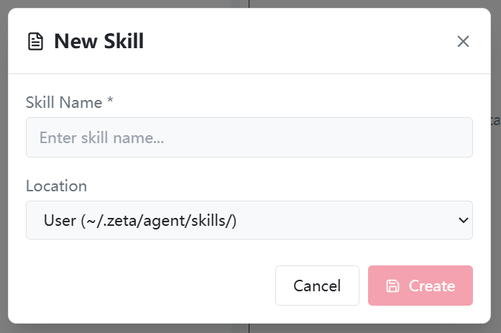
| Field | Description |
|---|---|
| Skill Name | Unique identifier for the skill |
| Description | Detailed description of the skill |
| Read Conditions | When to load this skill |
| Allowed Tools | Tools the skill can use |
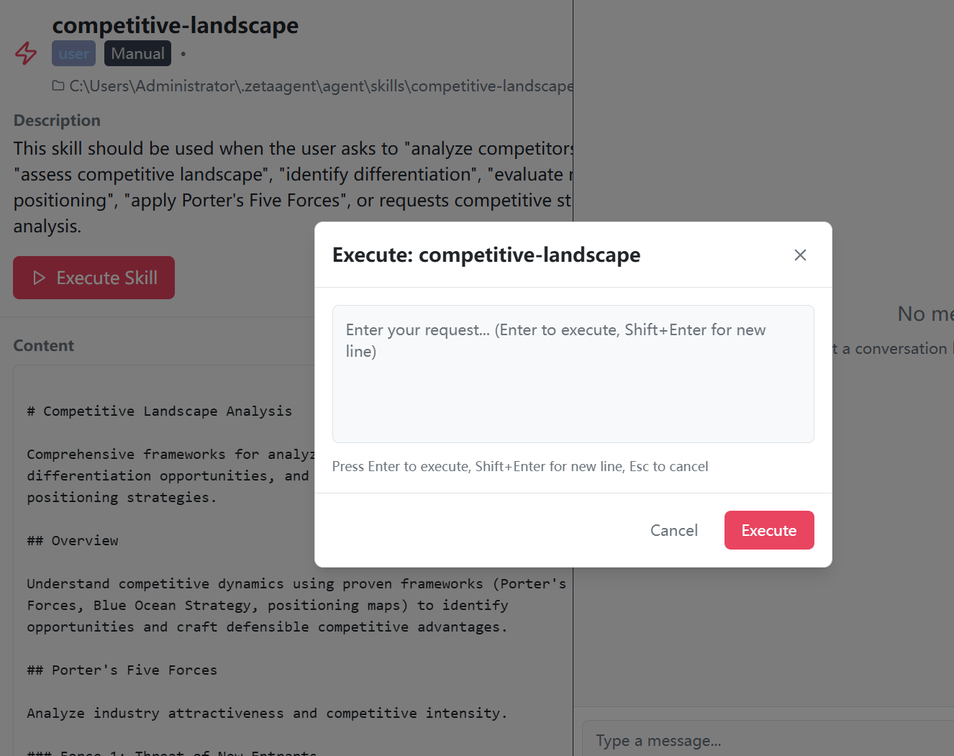
7.5 Execute Skill
Manual Execution:
- Click on skill name in the skill list
- View skill details
- Click
Executebutton - Enter request content
- Press Enter to execute
Auto Trigger:
When auto_inject: true and the skill is added to the skills array in settings.json, the skill will be automatically injected into the system prompt and available when related use cases are detected.
7.6 Built-in Skills
ZAgent comes with several pre-built skills:
| Skill | Description |
|---|---|
| Agent Browser | Browser automation for web page interaction, data extraction, and form submission |
| Ask LLM So Bored | Creative conversations and brainstorming for relaxation |
| Competitive Landscape | Market competition analysis and competitive intelligence |
| News Update | Gather and summarize latest news on specified topics |
| QQMail Manager | QQ Mail operations including reading, organizing, and drafting |
| Wiki Ingest Article | Ingest articles and documents into the Wiki knowledge base |
| Wiki Maintenance | Maintain and organize the Wiki knowledge base structure |
Agent Browser Skill Example
Used for browser automation, see documentation for detailed commands:
# Install
npm install -g agent-browser
agent-browser install

# Basic Usage
agent-browser open <url>           # Open page
agent-browser snapshot -i           # Get interactive elements
agent-browser click @e1            # Click element
agent-browser fill @e2 "text"      # Fill form
agent-browser close                 # Close browser
8. Task Scheduling
8.1 Concept Explanation
Task is an automated operation that executes on a schedule and can:
- Run skills
- Send messages
- Execute commands
8.2 Create Task
- Switch to the
Taskstab in the right panel - Click
New Task - Fill in task information:
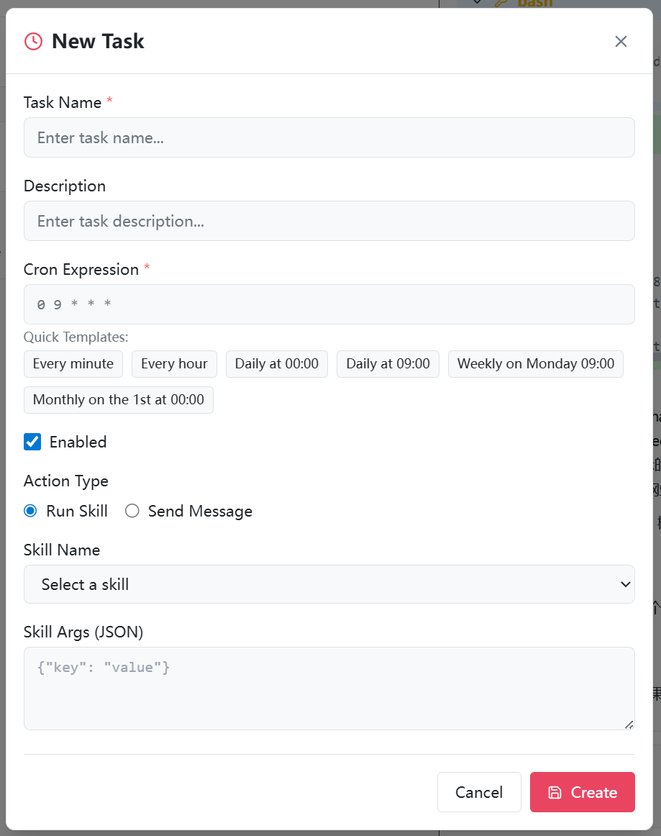
Required Fields:
| Field | Description |
|---|---|
| Task Name | Unique identifier for the task |
| Cron Expression | Execution time schedule |
| Operation Type | Run Skill or Send Message |
| Skill Name | Skill to execute |
| Skill Parameters | Skill parameters (JSON) |
Operation Types:
| Type | Description |
|---|---|
| Run Skill | Execute the specified skill |
| Send Message | Send message to main session |
8.3 Cron Expressions
Common Templates:
| Expression | Meaning |
|---|---|
* * * * * |
Every minute |
0 * * * * |
Every hour |
0 0 * * * |
Daily at 0:00 |
0 9 * * * |
Daily at 9:00 |
0 9 * * 1 |
Every Monday at 9:00 |
0 0 1 * * |
First day of month at 0:00 |
Quick Template Buttons:
- Every minute
- Every hour
- Daily at 0:00
- Daily at 9:00
- Every Monday at 9:00
- First day of month at 0:00
8.4 Manage Tasks
| Operation | Description |
|---|---|
| Execute Now | Execute task immediately (skip schedule) |
| Edit | Modify task configuration |
| Delete | Delete task |
| Enable/Disable | Toggle task status |
8.5 Task Status Display
Task list displays:
- Next execution time
- Last execution time
- Status (enabled/disabled)
9. Feishu Integration
9.1 Feature Description
Feishu integration allows:
- Receive Feishu messages as user messages
- Send assistant replies via Feishu
- Multi-platform message synchronization
9.2 Configuration Steps
Step 1: Create Feishu App
- Open Feishu Open Platform
- Create a self-built app
- Enable WebSocket long connection
Step 2: Get Credentials
Get the app's:
- App ID
- App Secret
Step 3: Configure App
- Click
Settings→Feishu Settings... - Fill in configuration information:
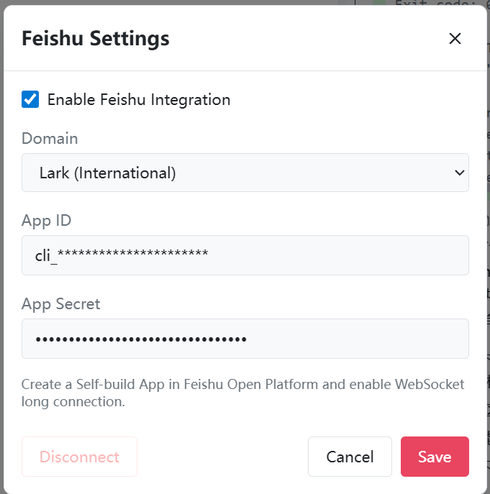
| Field | Description |
|---|---|
| Enable Feishu | Turn Feishu integration on/off |
| Domain | Feishu (feishu.cn) or Lark (international version) |
| App ID | Feishu app ID |
| App Secret | Feishu app secret |
Step 4: Add Bot
Add bot to Feishu group chat:
- Use app bot
9.3 Using Feishu
Connection Status:
Status bar shows Feishu connection status:
| Status | Description |
|---|---|
| Feishu Connected | Connection successful |
| Feishu Disconnected | Not connected or connection lost |
Message Flow:
Feishu Message →App →User Message →AI Processing →App →Feishu Reply
Toggle Feishu:
- Enable: Feishu messages as user message input
- Disconnect: Only desktop client available
9.4 Message Queue
Feishu messages enter the message queue and are processed in order:
- Status bar shows message status
- Logs show queue information
- Prompt retry later when queue is full
10. Troubleshooting
10.1 Common Questions
Q: Application fails to start
A: Check the following:
- Confirm Visual C++ Redistributable is installed (Windows)
- Confirm port 1420 is not occupied
- Check error information in logs
Q: Model cannot connect
A:
- Check if API key is correctly set (either directly entered or via environment variable)
- Check network connection
- Try configuring proxy
- Check if model configuration is correct
Q: Skills cannot load
A:
- Check if skill file path is correct
- Check if skill file format is correct YAML
- Check error information in logs
Q: Feishu cannot connect
A:
- Confirm App ID and Secret are correct
- Confirm app has WebSocket enabled
- Confirm bot has been added to group chat
10.2 Reset Configuration
If you need to reset all configurations:
- Close the application
- Delete configuration folder:
- Windows:
%USERPROFILE%\.zagent\
- Windows:
- Restart the application
11. Wiki Knowledge Base
11.1 Feature Description
ZAgent has a built-in personal Wiki knowledge base system, allowing AI to read, search, and manage your knowledge notes, achieving true personal knowledge augmentation.
Core Features:
- Bidirectional Linking - Supports block references and backlinks, creating a knowledge network
- Full-text Search - Quickly locate the content you need
- Knowledge Ingestion - Supports file import, automatic parsing and integration into knowledge base
- AI Context Augmentation - AI can directly reference knowledge base content for more accurate answers
11.2 Storage Structure
Wiki knowledge base file structure:
.zagent/
└── kb/                  # Knowledge base root directory
    ├── daily/           # Daily notes
    ├── concepts/        # Concept documents
    ├── sources/          # Source materials
    └── pages/           # Page documents
11.3 File Format
Wiki uses Markdown format with block reference syntax:
# Page Title

This is the main content.

## Block Reference

Use block ID for reference: ((b-abc1234))

Use embed syntax: {{embed: ((b-abc1234))}}

## Backlinks

Block ID format: {#b-abc1234}
11.4 Usage Methods
Create Note:
- Switch to the
Wikitab in the left panel - Click the new button
- Select note type (daily/concept/page etc.)
- Write content
Search Knowledge:
- Click the search icon in the Wiki panel
- Enter search keywords
- Browse search results
Import File:
- Click the import button
- Select file to import
- File is automatically parsed and added to knowledge base
11.5 AI Integration
AI can access the knowledge base through the wiki_compile_prompt tool:
- Read page content
- Search related notes
- Get backlink relationships
- Compile context prompts
12. High-Speed Code Analyzer
12.1 Feature Description
ZAgent has a Rust-implemented high-speed code analysis engine that can parse code structure at millisecond level, allowing AI to understand your code in seconds.
Performance Advantages:
- Millisecond Response - Rust implementation, parsing speed far exceeds traditional solutions
- Complete Structure Analysis - File structure, function definitions, class structures at a glance
- Call Relationship Graph - Function calls, import relationships visualized
- Precise Positioning - Quickly find function definitions and reference locations
12.2 Analysis Capabilities
| Analysis Type | Description | Supported Languages |
|---|---|---|
| File Structure | Directory tree, file list | All |
| Function Definition | Function name, parameters, location | Rust, TypeScript, Go, etc. |
| Class Structure | Class name, methods, inheritance | Object-oriented languages |
| Call Relationship | Callers, callees | All |
| Import Relationship | import/export analysis | All |
| Statistics | Code line count, language distribution | All |
12.3 Usage Method
AI automatically analyzes code base through code analyzer tool:
{
  "action": "analyze",       // analyze, structure, definitions, calls, imports, stats
  "path": "/path/to/code",  // Code path to analyze
  "languages": ["rust", "typescript"],  // Filter languages
  "max_functions": 200,
  "max_calls": 500
}
12.4 Output Examples
Structure Analysis:
src/
├── main.rs
├── lib.rs
└── components/
    ├── ChatTab.tsx
    └── BrowserTab.tsx
Function Definitions:
src-tauri/src/commands/shell.rs:21
  shell_execute(input: ShellInput) -> Result

src-tauri/src/commands/wiki.rs:9
  wiki_read(path: String) -> WikiContent
Call Relationships:
agent_loop →run_loop →execute_tool
                     →get_steering
                     →create_skip_message
13. Memory System
13.1 Feature Description
ZAgent has powerful long-term memory capabilities, able to remember your preferences, habits, and important information, making every conversation build on understanding.
Core Features:
- Persistent Memory - Important information saved long-term, maintaining continuity across sessions
- Intelligent Extraction - AI automatically identifies and remembers key information
- On-demand Retrieval - Memory automatically integrated into context, no manual input needed
- Manageable - You can view, edit, and clear memories, fully controllable
13.2 Memory Types
| Type | Description | Lifespan |
|---|---|---|
| Short-term Memory | Current session context | During session |
| Long-term Memory | Persisted important information | Permanent |
| Project Memory | Project-specific context | During project |
13.3 Usage Methods
View Memory:
- Click menu
Settings→Memory Management... - View current memory content
Manage Memory:
- View - Browse currently loaded memories
- Edit - Modify memory content
- Clear - Delete unwanted memories
- Search - Search memories by keywords
13.4 Memory Workflow
Conversation →AI identifies important info →Write to long-term memory
                    →
New conversation →Retrieve related memories →Integrate into context
13.5 Memory Events
The system triggers memory-related events:
| Event | Trigger Condition | Description |
|---|---|---|
| MemoryFlushRequest | Context exceeds threshold | Request to flush memory |
| MemorySaved | Memory saved successfully | Confirm save complete |
| CompactComplete | Context compression complete | Show saved tokens |
14. Personalized Settings
14.1 Theme Settings
ZAgent supports light and dark theme modes.
Switch Method:
- Click menu
Mode→Dark Theme - Click menu
Mode→Light Theme
14.2 Language Settings
ZAgent supports Chinese and English interface switching.
Switch Method:
- Click menu
Mode→Language - Select
Englishor中文
Supported Languages:
| Language | Code | Status |
|---|---|---|
| Chinese | zh | Fully supported |
| English | en | Fully supported |
14.3 Context Compression Settings
Controls context auto-compression behavior.
Mode Options:
| Mode | Description |
|---|---|
| Auto Compress | Automatically compress when context reaches threshold |
| Manual Compress | Requires manual trigger for compression |
Switch Method:
- Click menu
Mode→Auto Compress - Click menu
Mode→Manual Compress
14.4 Feishu Connection Settings
Controls Feishu integration connection status.
Connect/Disconnect:
- Click menu
Mode→Feishu Connect - Click menu
Mode→Feishu Disconnect
14.5 Configuration Persistence
All settings are automatically saved:
- Theme preference
- Language selection
- Proxy configuration
- Model selection
- Compression mode
Configuration File Location:
%USERPROFILE%\.zagent\settings.json15. Open Source Licenses
15.1 Feature Description
ZAgent is built on top of many excellent open-source projects. We believe in transparency and giving credit where it's due. The application includes a built-in Open Source Licenses dialog that lists all packages used.
Key Libraries:
- Frontend: React, React DOM, TypeScript, Vite, Tailwind CSS, Monaco Editor, Lucide Icons, i18next, Zustand, and more
- Backend (Rust): Tokio, Serde, Reqwest, Chrono, and other core libraries
- Tauri Ecosystem: Tauri Core, Tauri Plugins
15.2 Viewing Licenses
To view the complete list of open-source licenses:
- Click menu
Help→Open Source Licenses - The dialog displays all 60+ packages with their names and license types
- Licenses include MIT, Apache-2.0, BSD-3-Clause, ISC, and other permissive licenses
15.3 License Summary
| Category | Key Packages | License |
|---|---|---|
| Frontend Framework | React, React DOM | MIT |
| Build Tool | Vite | MIT |
| Styling | Tailwind CSS | MIT |
| Editor | Monaco Editor | MIT |
| Icons | Lucide React | ISC |
| Markdown | Marked, Highlight.js, DOMPurify | MIT / BSD-3-Clause / Apache-2.0 |
| State Management | Zustand | MIT |
| Desktop Framework | Tauri | MIT / Apache-2.0 |
| Rust Runtime | Tokio | MIT |
| Rust Serialization | Serde | MIT / Apache-2.0 |